BLASTING FREE SOLUTION ROCK CRACKING SILENTLY WITH ZERO VIBRATION NO FLYOFF ROCK
GAURCRACKAMITE User Manual
Planning
Boulder Breaking, Rock Splitting and Cracking, Marble, Limestone and Granite Mining as well as Concrete Demolition has never been easier, safer and environmentally friendly than with Crackamite Non-Explosive Demolition Powder. Crackamite is a chemical mixture powder with super expansive strength when it is mixed with water. When this Crackamite mixture is filled into drilled holes, according to the appropriate hole design, Crackamite breaks apart concrete and cracks and splits rocks and boulders safely and quietly.
GaurCrackamite
Type:Universal type for all temperatures.Packing:5 Kg Crackamite in one plastic bag, 4 bags in one carton, and 50 boxes on one wooden pallet.Form:Powder and cartridge available.Reaction Time Control:Special Inhibitor available on request to control reaction time for special applications.
Temperature Estimation
As shown in the figure on the right, place a thermometer in the bottom of the hole and leave it in place for 2-3 minutes. Then quickly pull out the thermometer and take a reading. Avoid taking temperature right after drilling since the temperature of the hole is higher because of friction heat. The temperature of the rock or concrete being broken is important first step.
Hole Design
Crackamite's effectiveness depends on the placement, diameter and depth of the holes drilled in the material. The drilling must be done in relation to the job to be performed. The design for breaking should be done according to the properties of rocks, joint, volume to be removed, secondary breaking, and work period, etc.
Effective Hole Design for Crackamite
The hole design refers to the hole diameter and hole spacing/distance. For hole diameter between 30 to 50 mm, the hole spacing (distance between holes) should be in accordance with the following formula:
A = K x Dwhere, A - hole spacing (in mm),
D - hole diameter (in mm) and
K - cracking coefficient.
Hole Drilling
Crackamite's effectiveness depends on the placement, diameter and depth of the holes drilled in the material. To determine the right combination of hole size and spacing, first make a reference hole design using the parameters from the hole design sections, then drill several holes of different diameter at different burden and spacing. Now check the break conditions of each of them and then decide hole diameter, depth, burden and spacing.
Drilling
- Drilling machine: Use electrical drill, rock drill or crawler drill.
- Drilling direction: It is preferable to drill holes vertically, but in case of a wall or pillar of reinforced concrete where vertical drilling is difficult, an inclined hole may be drilled. Since a greater effect is achieved with a deeper hole, in case of a thin material, consideration should be given so as to get a long hole depth by drilling it obliquely, if necessary. Horizontal holes can have the same spacing as with vertical holes.
- Hole diameter and hole spacing: The breaking plan of the hole design sections should serve as a guideline in making this decision. In general, the preferable hole diameter is from 40 to 50 mm.
Hole Depth
- Maximum Hole Depth is 10 feet. (3.05 meter)
- Minimum Hole Depth is 4 times hole diameter; for example 5" with 1¼" hole, 6" with 1½". Holes shallower than 4 times diameter are likely to blow out.
- Recommended Hole Depth: In reinforced concrete, drill 90% to 95% of its depth. In a ledge, drill as deep as you want to remove. In boulders, drill 2/3rd to 3/4th of the rock's thickness. In soft rock, like Marble, hole depth is 100%. In middle or high hardness rock, like granite, hole depth is 105%.
Hole Pattern
- Holes must be drilled so as to allow a free face for the Crackamite to push towards. For example, drilling at a 45° angle in the flat surface of a ledge will push it upwards, but drilling straight down might not allow the pressure to go anywhere.
- To demolish a slab without pushing out the walls, which surround it, drill a cone shaped pattern at the centre and fill these holes first. The cone will pop upwards and create a free face.
- Hole pattern depends on tensile strength of what is being broken, amount of rebar, if any, and the size of the pieces you want when you're done. This can often be determined by experiment; a good starting point is to space holes one foot apart, in rows, one and a half feet apart. In non-reinforced concrete, holes may be spaced as far apart as 30 cm.
- Hole pattern also depends on how fast you need results. More holes spaced closer together will give faster cracking time and smaller pieces, but will cost more in terms of labour and Crackamite.
- Boulders are much easier to break than reinforced concrete or ledge, and drill holes can be spaced further apart, especially if breaking speed is not critical.
- Empty holes can also be used to direct cracks - they cost less than filled holes. This will save money compared to filling all the holes, but will slow down the breaking time.
Mixing
Crackamite is a powder that must be thoroughly mixed with clean water before use, in a ratio of 30 % of the overall weight (1.5 litres for each 5 kg package). Gradually add the powder to water, stirring all the time to obtain a smooth, lump-free mortar.
Mixing Equipment
Mix Crackamite with water, one bag at a time, by hand or, preferably, with a mechanical mixer. Prepare the following equipment:
- Container: A metal or plastic bucket or clean can of 10 - 20 litres capacity.
- Mixer: Preferably a handheld mechanical mixer.
- Water Measurement: Fixed volume bottle, beaker or measuring cylinder.
- Protection: Rubber gloves and boots, and safety glasses.
Mixing Method
Pour approximately 1.5 litre (0.4 U.S. gallon) of water into container. Add one bag of Crackamite gradually and mix well until it has a good fluidity.
When viscosity of the mixture of Crackamite and water is too high to pour into the hole, add a little water to get a good fluidity. Do not exceed 34% of water ratio (1.7 litre; 0.45 U.S. gallon per 5 kg; 11 lb. of Crackamite). The mixing time by hand-mixer is about 2 - 3 minutes. It is recommended that a mechanical mixer be used on large volume jobs. When mixing by hands, wear rubber gloves.
Mixing Water
- Use clean water that is not contaminated with oil, organic substances, etc.
- Use the proper temperature of water for each grade of Crackamite
- Water at a temperature below 15°C (59°F) must be used when the average atmospheric temperature is more than 45°C for Crackamite CM - H.
- The cooler the water is, the longer Crackamite mixture will remain fluid.
Standard Quantity
The quantity of Crackamite to be used for cracking differs with the hole spaces and diameters. In the table below, the relation between the quantity of Crackamite used and the hole diameters is indicated for the hole of 1 m depth, where Crackamite is mixed at a water ratio of 30%.
Kg/m values for different hole sizesHole Diameter30 mm32 mm34 mm36 mm38 mm40 mm42 mm44 mm46 mm48 mm50 mmCrackamite (Kg/m³)1.21.31.51.71.92.12.32.52.83.03.2Hole DepthOne MeterNote:You may get 3% to 6% less yield due to field conditions.
Audit Checklist Before Mixing
- Are people on the work site wearing safety equipment?
- What is the rock/concrete temperature?
- What is the water temperature?
- What is the drill hole diameter?
- Have you calculated the extra water required if rock/concrete temperature is above 22°C?
- Are you going to cover the filled holes with a tarpaulin sheet?
- How much time does it take to fill the hole?
Filling
Immediately after mixing the Crackamite powder into proper slurry, pre-drilled holes need to be filled with the Crackamite paste.
Filling of the holes with Crackamite
Please observe the following points while filling the pre-drilled holes with Crackamite:
- Crackamite should be poured into holes within 10 minutes after mixing with water. The Crackamite mixture may loose fluidity within 10 minutes of mixing and will become difficult to pour. Once its fluidity is gone, it should not be diluted by re-mixing with water, as its strength is reduced. Longer mixing time will cause blow-outs.
- Crackamite is best filled using a bucket with spout or funnel. For a horizontal hole use a grout pump. Drill horizontal holes with some slope to help in filling.
- Crackamite must be poured into every hole upto the brim.
- For a horizontal hole, the hole can be easily plugged with Crackamite as it reaches clay like consistency as it starts setting.
Use of polythene sack in hole

- If there is water in the hole, place a thin polythene sack equal to the hole diameter into the hole, insert a wooden rod into the bag and then fill Crackamite into the sack. Crackamite in the sack will displace the water in the hole. There is no change in the cracking strength by the use of this kind of sack.
- When there are many joints or large voids/holes in the material to be cracked or when Crackamite leaks from the hole, use the sack method.
- When a lot of the water in the Crackamite slurry is being absorbed into the material being cracked (for instance, a dry concrete), use the sack method or alternatively, spray water. However, in cold temperature, avoid pouring water as it may freeze in the hole.
- When the material to be cracked is immersed in water, use the sack method. Use a bucket or pump when filling the sack and then seal the sack from the top to avoid Crackamite slurry dilution. If there is no flow of water around the mouth of the holes, Crackamite may be directly poured into the holes using the pump. This should gently displace the water in the hole.
After Treatment
- DO NOT leave excess Crackamite slurry in the bucket as blow-outs may occur.
- Tamping with mortar or sand is not required after filling with Crackamite slurry. It is also not necessary to put any kind of restrictive cap. Just leave it as it is and wait until cracks initiate. Covering the filled hole with tarpaulin is desirable to avoid dilution of Crackamite slurry from external water source until cracking starts.
- Spraying the surface with water, after the cracks initiate, tends to increase the width of cracks and speeds up the cracking process.
Cracking
Crack Formation
Upon filling of the pre-drilled holes with the mixed Crackamite slurry, reaction immediately starts to occur in the Crackamite. Upon reacting, the Crackamite mortar starts hardening and expanding causing the material to develop cracks. The cracks generally appear within 3 to 20 hours after filling, depending on the temperature. These cracks spread further and become wider with time.
Time Required for Crack Formation
Reaction starts as soon as Crackamite is mixed with water causing it to expand and harden. When the Crackamite expansive mortar is packed into a hole in stone or concrete, it swells and exerts pressure on the hole-walls and thus fractures it.
The cracks appear within 45 minutes after filling, depending on weather, rock or concrete temperature. The cracks become wider with time. The ambient temperature in the material being cracked determines the reaction speed. The higher the temperature, the shorter the reaction time.
The time required for full crack formation in material at 30°C is about 6 - 8 hours. The lower the temperature, the longer the crack formation takes. The crack width for rock continues to increase with time and can become 10 - 30 mm (3/8" - 1 1/8") after several days, depending on free surface available. It is best to wait until Crackamite has worked to full depth before removing the rock, as premature removal at the first sign of a crack can hamper the leverage effect of Crackamite.
Some points to remember after filling, while waiting for the cracks to appear:
- Tamping with mortar or sand is not required after filling Crackamite. It is also not necessary to put any restrictive cap. Just leave it as it is and wait until cracks initiate.
- Covering the filled hole with tarpaulin is desirable to avoid dilution of Crackamite from external water source until cracking starts.
- Spraying the surface with water, after the cracks initiate, tends to increase the width of cracks and speeds up the cracking process.
- If only small cracks are found, you can pour more water into the crack line for further expansion.
Controlling Expansive Strength and Reaction Time
For Crackamite, the higher the temperature, the quicker is the reaction. There are two ways to control the cracking agent's reaction time. For universal type, reaction inhibitors of 20 gram per bag are available for each 5 kg package in carton. 20 gm inhibitor can be added into water first and then the powder can be mixed to avoid the possibility of blow out shots. For quantity details refer to the following table:
Quantity if inhibitor requiredSite TemperatureQty of Bag (20 g)5 °CNone15 °C1 per 3 bag25 °C2 per 3 bag35 °C1 per bag
Cutting and Secondary Breaking
When the cracking gap is around 3 - 5 cm, you can carry out the further demolition work. After cracks initiate, secondary breaking is carried out with a hand-breaker, a pick-hammer, a giant hydraulic breaker, a ripper, etc. It is best to wait until the Crackamite has worked to full depth before removing rock or concrete since premature removal at the first sign of a crack hampers the leverage effect of Crackamite.
Type of secondary breaking requiredType of breaking by CrackamiteSecondary breaking requiredFragmentationHammer, Power shovelCrack FormationHand breaker, Power shovel, Hydraulic breakerPre-splittingCombination of mechanical breaker or dynamite
Please Note:
- Be sure to wear PROTECTIVE GLASSES when secondary breaking is carried out.
- The crack width for rock or concrete continues to increase with time and can become 10-30 mm (3/8"-1 1/8") after several days, depending on free surfaces available.
Precaution
Packaging and Storage
Crackamite is packed in 4 anti-moisture bags of 5 kg each and then placed in a waterproof carton with a total weight of approximately 20 kg.
- Although Crackamite is packed in anti-moisture bags, long storage may cause deterioration of its working ingredients. Therefore, store in a dry place and use it as soon as possible.
- When storing, do not place the bags of Crackamite directly on the floor. Put them on a pallet and keep in a dry warehouse. Crackamite stored in this manner, can be effectively used for 1 year.
- Crackamite should be unpacked properly in a low moisture environment before use.
- When storing the portion of Crackamite remaining after use, remove air out of the bag, seal it and use as soon as possible. However, as it may get exposed to moisture, there is a risk of Crackamite losing its effectiveness once the bag has been opened.
- If you receive damaged bags of Crackamite, they may not work due to chance of moisture absorption.
Recommendations For Crackamite Usage
- Use a pair of safely glasses, rubber gloves and dust mask when working.
- DO NOT look at any hole closely or directly within 2 - 3 hours after filling, as there may be splatter or a blowout.
- Store mixed or dry Crackamite properly.
- Choose the correct grade according to the working conditions.
Usage tips to achieve better results:
- Mix well and pour, while agitating the slurry, to make sure that no air gaps are left in the hole.
- Fill the hole almost to the top, leaving at least ½ inch before reaching the top.
- In summer, the best time to use Crackamite is early morning or evening when temperature of the material is low. High material temperature might cause blowouts.
- In summer, cover the holes to avoid direct sunlight, by using a tarpaulin or wet hay.
- When the ambient temperature is high, put some ice into the water, and then mix with Crackamite.
- Depending on the material to be cracked, Crackamite may be mixed with more water to lower the costs.
- For better results, it is important to note both air and material temperature. Material temperature is the temperature inside the rock or concrete which can be different from the air temperature. DO NOT GUESS! Tie a string on the thermometer and lower it into the drill hole.
- In winter, mix 1% calcium chloride with Crackamite.
- If Crackamite has completely dried into powder and there are no cracks, then pour additional water onto Crackamite filled holes.
- Never fill glass or metal containers with Crackamite or any container that widens towards the bottom.
- Never pump Crackamite with pressure.
- Mixing by hand lengthens mixing time, and is more likely to result in a blowout.
- When rock or concrete temperature is above 23°C, add approximately 150 ml of extra water per 5 Kg bag.
- Holes have to be cleared after hole drilling
- For marble the hole depth has to be 95% - 98%
- To make the splitting faster, more number of holes are to be made closer to each other.
- For 5 kg of Crackamite 1.5 ltr clean cold water has to be added.
- The mixture has to be continuously stirred to avoid lumps
- The mixture has to be poured within 10 minutes of preparation
- After filling the holes, cover the same with tarpaulin to avoid direct sunlight
- Cold Water may be added to the holes after 2 hours to speed up the process.
- For 5 kg powder add 1.5-ltr water, the total volume will become 2.68 ltr. This is sufficient to fill 11 running feet of 32 mm holes with the mixture.
- Shelf life of Crackamite is one year - Two years depending on the storage conditions, i.e. humidity, ambient temperature etc.
- The best results can be achieved with experiments on the actual work site, as the hardness, density and other parameters of stone / concrete to be cracked and working conditions vary from time to time and place to place.
Safety Precautions
- Do not use Crackamite for purposes than cracking rocks or concrete.
- Crackamite is a highly alkaline product. The ph reaches 13 after contact with water and can cause severe irritation to mucous membranes, especially eyes. Rinse with large amounts of water any portion of the skin that comes in contact with Crackamite. Consult a doctor immediately.
- Wear safety glasses, rubber gloves and a helmet during Crackamite handling, mixing and filling. Wear a dust mask when using Crackamite in poorly ventilated areas such as tunnels or mines.
- Do not pour and leave Crackamite in bottles or cans to avoid shattering of the bottle or can.
- Do not look directly into any holes for at least 6 hours after pouring. Crackamite may splatter or blow out of the hole due to heat generation when temperature of material to be broken is over the temperatures found in the temperature chart. Do not get your face close to or stand near filled holes for at least 3 hours after completion of filling.
- Shelter the holes from rain or sunlight only with a tarpaulin sheet.
- Do not use hot water.
- Do not mix over one bag (5 kg, 11 b.) of Crackamite with water at a time.
- Use the proper grade of Crackamite .
- Keep out of reach of pets and children
Notes On Crackamite Working
- The most cost effective demolition technique for ledge demolition is a combination of Crackamite (to produce cracks) and a hydraulic hammer or a jackhammer. Drill holes can be spaced out further in this case.
- The best way to demolish underwater rocks or concrete is to build a cofferdam and pump out the area. Crackamite hardens in fifteen to twenty minutes, and after that the area can be flooded again.
- Crackamite must be used in holes; pouring it into existing cracks in the rock will not work.
- Safety glasses must be worn at all times by everyone in the area. Hard hats and steel-toed boots are a good idea on any construction or demolition site.
- When using the usable temperature chart, bear in mind that the actual drill hole temperature may be much higher than the surrounding air temperature if it is in the sun or affected by nearby heat from machinery or from drilling the holes.
- Cold temperature, hard rock, or holes spaced too far apart can lengthen breaking times. If it did not crack overnight - wait a while before assuming failure. Crackamite continues to increase pressure for 24 - 28 hours
- When mixed, if Crackamite begins to steam in the bucket, add ½ gallon or more of water, stir, and throw it away. You've allowed too much time to pass from beginning to mix.
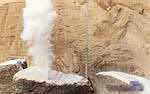
- If filled holes start to smoke or steam, that is a sign they may be about to blowout. Immediately clear the area of people. The vapours are only steam, and are not hazardous or toxic in any way.
Blowouts - Causes and Precautions
What can cause a blowout?
- Using too large a hole diameter.
- Using too warm mix water. See the temperature chart.
- Using too little water, especially when rock or concrete is above 23 °C.
- Too much time passing between beginning to mix and filling holes.
- Mixing by hand.
- Guessing at drill hole temperature instead of measuring it.
- Guessing at water temperature instead of measuring it.
- Holes that are too shallow. Depth MUST be 4 times the diameter or more.
- Allowing the powder to become too hot before mixing with water.
- A "know-it-all" attitude that causes some people to ignore this manual instead of reading it thoroughly, cover to cover.
- Holes drilled closer than 10 " apart in soft rock or concrete, in hot weather
- Drill hole diameter 1½" is the best to work with
- Blowouts will usually not occur more than 3 hours after filling holes.
How to prevent blow outs
- Use the right grade of Crackamite for the temperature range, especially with rock or concrete.
- Keep every source of heat away from Crackamite
- Do no store Crackamite in direct sunlight or near a source of heat. Cool Crackamite before use.
- Do not mix Crackamite into small or narrow-mouthed plastic cans or bowls. Instead use a metal bucket.
- Cool every tool you are going to use before mixing.
- Use the indicated water amount (1.5 litre for each bag of 5 kg of product)
- Do not use hot water to mix Crackamite
- Mix manually no more than two bags (10 kg) for each batch at a time.
- Mix thoroughly, avoiding lump formation for at least 2 - 3 minutes.
- If the mortar becomes slightly stiff, add a little more water to achieve the right fluidity.
- Pour all freshly mixed mortar into holes within 5 minutes of mixing.
- Do not overfill the holes
- Do not tamp filled holes with bars or similar tools
- Do not plug holes with hard or setting materials after filling.
- Do not pour Crackamite mortar into glass bottles or similar containers; the pressure will shatter the glass. Dispose off unused mortar only after substantial dilution with water on an open surface.